Monday, December 28, 2009

Compost Worms

This is a view of the screened vents, one on each side of the lower castings harvest tray.

This is a view of inside of the worm bin. The bottom grate allows for worm castings to be raked to the collection tray by the rake that is mounted on top of the grate. The thought is that as I pull the rake, the castings will be dislodged to the collection drawer below. I insulated the inside of the worm bin with 3/4 inch rigid foam insulation to help keep a consistant temperature in the bin. The insulation also protects the worm bin from moisture.

This is a view of the rake that has been swept across the grate.


This is the handle of the rake that has been pulled to show you how this works.


The rake is now in its storage position


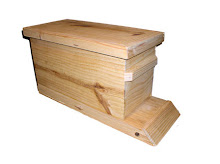
This is a view of the complete worm bin. It is mounted on 4 casters and has a drawer at the bottom to retrieve the worm castings. A top is not necessary. The idea is that the worms will stay in the top 4 inches of compost (where the food is). The waste will remain at the lower label where this is dislodged with the rake to be harvested. Simple in concept, I just hope it works.


A view of the lower collection bin and drawer. Ventilation holes are also seen.


A better view of the collection tray with collection drawer.


Drawer open for collection of excellent quality worm castings.


Ok, So nothing is going on with the bees other than occasional feeding as needed. The remaining hives are looking good. I started reading about composting and thought this would be a good winter project. I began reading what I could on the web and decided to build a flow-through worm composting bin. I've seen several commercial ones on the net and a few basic ones made from plastic totes. I decided to build one of my own design based on a flow-through system. These systems are easily cleaned and castings are harvested relatively easily. I purchased about 2000 worms from a local worm grower for the bedding of my new worm bin. Check out the photo's. Maybe you will be entertained some how.

Friday, December 18, 2009

Fed the Bees

I removed the dead hive from the apiary today. I'll keep the wax in a sealed tote for use next year with a new hive. No sign of disease, the simply starved. So, you guessed it, I fed the other bees today. It was a beautiful day at up to 60 degrees F. The bees were active as well. I fed the bees honey, one quart each hive. Hopefully this will make a difference. I'll keep a check on them.

Friday, December 11, 2009

Hive Lost Ahhhhhhhhhhh!

Ok, I have been busy installing solar on my house and I have neglected to check on my bees like I should have. You guessed it, I lost a hive. There were many dead bees at the entry, I opened the hive, there was about 4 inches of dead bees on the bottom board, that made me frustrated. The combs were empty of any honey. No obvious sign of disease, I think they starved to death. The other 3 hives are doing ok though. This was a hive that I split later this summer. It seems like anytime that I attempt to mess with a hive late in summer, something bad happens to that hive. I must have left them with too few honey stores. O well, you live, you learn. I should have been checking them more often. My fault. Come on winter solstice December 21. I do not like cold weather.

Wednesday, November 25, 2009

Just an update

Well, Winter is near and the bees come out when it is warm but otherwize nothing exciting has been happening with them. I have not been doing much with them. I have been involved with installing a solar panel grid tie system on my house. I have been making post related to that on my other blog. If you are interested in that sort of thing you can see the blog at www.mygridtie.blogspot.com

Monday, November 9, 2009

Hedge Hog Mushrooms

Yesterday I picked 2 hedge hog mushrooms from the back yard and I had a strong desire to eat them just to do it. I washed them, and cut them lengthwise. I then added the mushrooms and margarine to a pan as well as onions and then saute'ed them.
In another pan I put 2 chicken boullion cubes (I had rather have beef boullion cubes)and added sliced bell peppers and carrots. I then combined the two and simmered over low heat for a little while until slightly soft. I then served these over white rice. It was excellent. I could not get my wife or little girl to eat it though.
Anyway it was fun to prepare a dish that came from my backyard (except the rice).

Friday, October 23, 2009

New Hive doing ok.

I know its late to start the hive but but I kind of had to. This was a hive that had declined to almost nothing, so I added more bees from my other hives, added fresh honey and added a new queen. I opened the hive last week and I have fresh brood, and the bees are steadily working in the pollen. I have the opening reduced to about 2 inches. Hopefully they will make it. We shall see. The goldenrod are still in bloom but I think there are more fall daisies now.

Wednesday, September 30, 2009

New Queen Arrived

Today, my new queen arrived from Alabama (Rossman Apiarys). I placed her in the nuc hive accordingly and moved the hive about 5 miles away to another location. The nuc has 3 frames with lots of honey and I placed a honey feeder in the place of the 4th frame. I filled the frame feeder with about 1 pint of honey for the bees to enjoy while all of the change is going on. Hopefully they will prosper. I used the stand that I built in the demonstration video in the blog below.

Sunday, September 27, 2009

Fall Harvest

Today I extracted the honey from my 4 hives today. Actually only 3 of the hives had enough to extract but I ended up with 3.5 gallons. I made sure to leave the hives with plenty of honey for the winter as well. We are having a major blooming of flowers here in La and the bees are working like crazy. I think they still have time to replenish what I took. The honey was somewhat darker than the spring honey and I thought it would not be as sweet, but I was wrong, this darker honey is actually smoother tasting and sweeter for some reason. So far this is the best honey I have ever tasted from my hives. I also took 2 frames of brood/honey/and bees from my best hive and added it to my new nuc hive, the queen will arrive this week and I will introduce her to her new nuc. I hope I am able to keep it through the winter. I have plenty of honey to feed the nuc. This weekend I mounted my John Deere and plowed several acres of my tree farm land and I planted a white clover for the bees next spring. I do not know much about the clover but it is suppose to have a large white flowering head. The type of clover is called Ladino.

Friday, September 25, 2009

Hive Recovery

I gave my father in law a hive earlier this year and it did not prosper. In fact, it lost the majority of the bees. He is not a bee keeper but he wanted a hive for his garden. I inspected the hive the other day and there was only about 2-300 bees in the hive but the queen was still present. No eggs, no brood. I took the frames that had the bees and queen and placed them in a nuc hive. I ordered a new queen and she is to arrive next week. I also added a couple of frames from my good hives to the nuc hive to strenghten the numbers. I am hoping that with the addition of a new queen (after I kill the old queen) will at least allow the hive to survive until next spring. I plan to feed the hive often through out the winter and hopefully will have a nice healthy start on a new hive for next year. We have wildflowers in full bloom this time of year especially the golden rod.

Sunday, September 13, 2009

How I build my hive stands

Hive stands are often overlooked to new beekeepers. I feel as though a simple and effective hive stand is of utmost importance especially here in the south where crawling insects can totally destroy a hive. I have included a video on how I build my simple but strong hive stands. I hope this helps.

Saturday, September 12, 2009

Photo's of the garden

Ahh, Louisiana Jalapeno
Tomatos

Tommytoes

These are great with a salad.
We eat these bell peppers on home made pizza and home made spaghetti omong other food.


They are as good as they look.


O yea, the watermellon is nearly ready to harvest. See the earlier post to see how much it has grown.


Thursday, September 10, 2009

Golden Rod Now Blooming

I just noticed that the golden rod wild flowers are now blooming around here. I just checked my hive this weekend and they have not grown very much. Hot, dry, not much to feed on. Hopefully they will now grow with the fall flowers beginning to bloom. I planted 2 rows of english peas last week and they are up and looking good. I also planted 9 broccoli plants but 2 were cut down by cut worms. Still harvesting bell peppers, cucumbers, squash, and jalapeno peppers.

Sunday, August 23, 2009

Not so smooth landing I made this weekend.

My wife and I went flying this weekend. She recorded the landing and once we reviewed the video at home, it looked like we were in a NASCAR crash. At any rate the landing was not all that bad. I am sure the bees do better than this though.

Wednesday, August 19, 2009

Yes that is a trash can. I built my 4 frame extractor using a new food safe trash can for the body of the device. I have an earlier post on the project if interested. It works great.
I really like the old cast iron honey gate (another antique). Works fine.


This is my set up that I have prior to going to my apiary to rob the hives. I have a 16 ft trailer attached to my tractor that I do all of the dirty work, I do not care if I get some honey on the trailer.

Saturday, August 15, 2009

Honey Sells

We processed our cucumbers into dill pickles. Awesome!

I know it is unorthodox but it works fine for me.
This frame was only 50% capped, I did not extract this but thought it would give a good photo of the difference of capped and uncapped honey. The uncapped honey (in the lower half of the frame) contains too much moisture to extract and may spoil. You really need to extract only honey that is capped (unless you are a comercial operation and have a way to monitor and control moisture.


Zucchini (I think that is how you spell it)


Ok, this water mellon decided to grow on the fence, so I built a sling for it so it would not fall. My wife thought this was funny.


The word is now out that I have bees and honey and most folks really enjoy the fact that this is a local product and is good for their seasonal allergies. The garden has done well this year, in fact I just ate watermellon. (Delicious). Check out the photos of the garden.

Monday, August 3, 2009

August Honey

This past week (July 29) I extracted honey from two of my fathers hives (7 gallons) and from 2 of my hives (4.5 gallons). This honey is a little darker from the spring honey earlier this year. At any rate, the honey has a good taste.

Saturday, June 13, 2009

Irresistable Photo's

Ok, I intended to take a photo of the honey but, I had to get this shot.
Fresh Honey and Fresh Veggies.

Is it just me or is this just adorable?

Ok, here is the photo of a representative sample of the honey that I just extracted yesterday. This is a lighter honey this year and I prefer this to darker honey. I still have another hive to extract soon.

Friday, June 12, 2009

Honey Harvest Today

Updated Garden Photo.
Blanc Dubois Grape Vines. They are pierce disease resistant.

Perfectly capped honey. All of the frames were capped like this.


Another capped frame.


This came from 2 of my hives.


Today I finally had time to harvest the honey. I opened the first hive and I was surprized to see that every single frame was full of capped honey, pristine white. I ended up with about 8 gallons of honey from two of the hives. I could not harvest the third hive because I ran out of containers, so I'll harvest it later. I have never harvested such a bountiful honey crop. Check out the photo's. I also included updated photo's of the garden above.

Saturday, May 23, 2009

The Smoker is Now Painted


The smoker is now painted. I am planning to cook chicken tomorrow for the family and in -laws for Memorial Day.

Sunday, May 17, 2009

Updated Photo of Garden


Looking good, looking good.
The snap beans are nearly ready to harvest. Some squash will soon be ready also. I am usually picking a handful of strawberries every other day. My blanc dubois cuttings are also healthy.


This is a smoker/cooker that I built from an old used water well bladder tank. It holds the desiered temperature well and will cook for 5 or 6 hours on only 40 charcoal briquets. This was a fun project. I have yet to paint it. I wanted to make sure all items were fine tuned before painting. Its's ugly but it works great.
This is the catfish trap that I built today. I will try to document the catfish harvest. Maybe someone will find this pretty neat. Like I have said before, you can never till what sort of strange project I have going on. I lost my other trap in the river.


This is a photo of my grapes that I am growing. This is the second year for the vines and I have allowed a few of them to produce grapes. The variety is blanc dubois. They are suppose to be pierce disease resistant.


Saturday, May 2, 2009

Recent Photo's of Bees & Honey

This year I have started a garden from some very good soil. I have burned my wood flitches and scrap wood here for about 10 years. The soil is dark and grows very large weeds so I thought I would make a garden out of the spot. The bee hives are within 50 feet of the garden. Hopefully I will have some fresh veggies this year. I have planted corn, strawberries, peppers, squash, tomatoes, potato's, bush snap beans, and my grape vine cuttings were rooted in 1/2 of of one row. The bees should enjoy this.


This is another view of the garden that I have started this year. I put an 8 foot cyclone fence around it to be sure I have no deer in there. It is small (23' x 23') but I have 7 rows of veggies in an area that I can reasonably manage and water. (I ran a 3/4" water line to the garden underground and have it set up nicely for irrigation purposes.)


It is hard to see but the extractor had honey almost to the extractor cage.


It was about 3 1/2 gallons in there that we extracted from 2 hives.


I am now emptying the extractor with a screen filter.


Ahhhhhhh the sweet rewards of backyard bees.


This is a fun little video of the bees in action.


This is a photo of my 3 hives that I keep in my backyard. The middle hive is the new split hive.


Thursday, April 30, 2009

Update on the Swarm Catch

I have been checking on the swarm that I caught using the bee pheromone and the hive is growing nicely. I added three more frames of foundation to the nuc hive the other day and all looks ok. I am going to leave the nuc hive at its original location until the hive is stronger and I will then transfer to a full size Langstroth. I opened my other hives today and for some reason the bees are not moving above the queen excluder below the new supers that I placed this year. I have heard others have had this problem also so I removed the queen excluders. The bees appear to be increasing in numbers. My Dad called me today and he has caught another swarm for me. I think I will place this hive in my father-in-law's garden. The hive beetles are definitly under control with the traps. Excellent move installing the beetle traps.

Friday, April 24, 2009

Swarm Catch

The other day I placed a nuc hive on a tree with new swarm pheromone attached to the front. I did this to two nuc's. I just checked the boxes and I actually have a swarm in one of the boxes. That pheromone really works. Today I filled the swarm catch box with frames (I only originally placed 2 frames with wax because I was doubtful that I would actually catch a swarm.) At any rate I have a new hive to manage now and it was essentially free and required only a small effort to attach the nuc hive to the tree. Not bad for a few minutes work. The other 3 hives are growing quickly. I am anticipating harvesting honey from them in about 2 months. My Father also caught a swarm for me the other day, I just need to have the time to go get it, that will give me 5 hives. I have been giving honey away to all friends and work cohorts. It is a pleasure to share the honey with others.

Friday, March 27, 2009

Added Honey Supers

The hives are doing great, I now have 3 hives since the split. I think they have actually increased in size and vigor more rapidly than if I had not split the hive. I feel that the hives should be challenged to prevent swarming. I have very little hive beetles since I installed the hive beetle traps in my hives. I am now only seeing 2-3 hive beetles with each inspection. I placed a queen excluder below each honey super. Hopefully we will be extracting honey soon.

Saturday, March 21, 2009

Split a Hive

On March 17 2009 I formed a new hive from two hives. The procedure I used is as follows:
First I smoked the donor hives and opened them to the brood hive. I took 2 frames of brood, and 2 frames of honey from one hive and 3 frames of brood (opened and closed) from the other donor hive. I did not shake the nurse bees. I added some empty fundation to make a total of 10 deep frames to start the new hive. I was careful not to take the queens from the two donor hives. I also switched the new hives location and orientation to the same location of one of the donor hives. I turned one of the donor hives a different direction. This was done so that returning field bees would go to the new hive and not the donor hive. On March 21 2009 I introduced a purchased queen to the new hive. I could have allowed the new hive to start their own queen but I did not feel like waiting 3 or 4 weeks for her to start laying. At any rate I now have a new hive that is growing quickly. I feel that you must challenge your hives to prevent swarming. This allows healthy multiplication of your hives. Oh and by the way, the small hive beetle traps are excellent. I did not observe any SHB's during the above process.

Monday, February 16, 2009

Hive Beetle Trap

This gives you an idea of how the oil trap is accessed from the rear.
There were 7 small hive beetles in the oil after about 20 hours. Some pollen in there also.

This is how I access the hive trap from the rear of the beetle trap.


This is a photo of the beetle trap installed on my bee hives.


This shows a good overall view of the trap.


The cookie sheet slides out for easy access.


The door fits snugly into the opening and the latch is closed to secure the door.


Door is in and latch closed


I recently built hive beetle traps for my hives. They are quite simple to construct. They are essentially the same outer dimensions of a Langstroth hive. I used 1 1/2 x 3 1/4 inch lumber to build the main frame, I then stapled #6 hardware cloth to the top. I have a shelf for the cookie sheet (10x15) and I have rear access to the cookie sheet that has used cooking oil in it. The results are amazing. I was told by an old bee keeper that this is all he uses for management of the hive beetles and that I would have a hard time maintaining my hives with hive beetles present. No chemicals needed. This is one of the most effective traps I have seen for small hive beetles. I took a video of my bees the other day and wanted to try this out on the blog, hope you enjoy this. Photo's of the hive beetle traps are soon to be posted.


Check out the little video of my bees.