

This is a view of inside of the worm bin. The bottom grate allows for worm castings to be raked to the collection tray by the rake that is mounted on top of the grate. The thought is that as I pull the rake, the castings will be dislodged to the collection drawer below. I insulated the inside of the worm bin with 3/4 inch rigid foam insulation to help keep a consistant temperature in the bin. The insulation also protects the worm bin from moisture.

This is a view of the rake that has been swept across the grate.

This is the handle of the rake that has been pulled to show you how this works.

The rake is now in its storage position

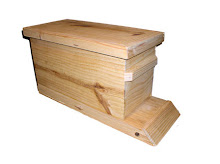
This is a view of the complete worm bin. It is mounted on 4 casters and has a drawer at the bottom to retrieve the worm castings. A top is not necessary. The idea is that the worms will stay in the top 4 inches of compost (where the food is). The waste will remain at the lower label where this is dislodged with the rake to be harvested. Simple in concept, I just hope it works.
 A view of the lower collection bin and drawer. Ventilation holes are also seen.
A better view of the collection tray with collection drawer.
 Drawer open for collection of excellent quality worm castings.
Ok, So nothing is going on with the bees other than occasional feeding as needed. The remaining hives are looking good. I started reading about composting and thought this would be a good winter project. I began reading what I could on the web and decided to build a flow-through worm composting bin. I've seen several commercial ones on the net and a few basic ones made from plastic totes. I decided to build one of my own design based on a flow-through system. These systems are easily cleaned and castings are harvested relatively easily. I purchased about 2000 worms from a local worm grower for the bedding of my new worm bin. Check out the photo's. Maybe you will be entertained some how.


6 comments:
Everytime I throw out potato peels, or anything else of the like I think about composting. One of these days..
Inventor Paul strikes again! Nice design and I think it will work well. I have big compost boxes in the garden but they are frozen right now. Lots of worms buried deep in the ground to stay warm. Hope your new year is great!
Can't wait to see what else you'll come up with.
Lynn
Fantastic design Paul. I have a small plastic wormery which I got a few years ago although it's never been all that successful so I'm really interested to see how you get on. Once again, brilliant!
Thanks for the encouragement guys. I appreciate you guys actually reading my blog. I'll keep you updated on how it goes.
It was ten below here on the Ozarks Ponderosa this morning. The worms are waaay down in the snow coverd tundra right now. Great job!!!
You have yourself a wonderful day and God bless ya'll!
Paul, How did your raking mechanism work out. I am trying to figure out a similar grate raking system for the worm bins I am designing. I am interested in learning more and finding out more about the rake you created. I have some questions for you. My email is maya {dot} donelson {at} gmail.com
Thanks!
Post a Comment