Friday, June 12, 2009

Honey Harvest Today

Updated Garden Photo.
Blanc Dubois Grape Vines. They are pierce disease resistant.

Perfectly capped honey. All of the frames were capped like this.


Another capped frame.


This came from 2 of my hives.


Today I finally had time to harvest the honey. I opened the first hive and I was surprized to see that every single frame was full of capped honey, pristine white. I ended up with about 8 gallons of honey from two of the hives. I could not harvest the third hive because I ran out of containers, so I'll harvest it later. I have never harvested such a bountiful honey crop. Check out the photo's. I also included updated photo's of the garden above.

Saturday, May 23, 2009

The Smoker is Now Painted


The smoker is now painted. I am planning to cook chicken tomorrow for the family and in -laws for Memorial Day.

Sunday, May 17, 2009

Updated Photo of Garden


Looking good, looking good.
The snap beans are nearly ready to harvest. Some squash will soon be ready also. I am usually picking a handful of strawberries every other day. My blanc dubois cuttings are also healthy.


This is a smoker/cooker that I built from an old used water well bladder tank. It holds the desiered temperature well and will cook for 5 or 6 hours on only 40 charcoal briquets. This was a fun project. I have yet to paint it. I wanted to make sure all items were fine tuned before painting. Its's ugly but it works great.
This is the catfish trap that I built today. I will try to document the catfish harvest. Maybe someone will find this pretty neat. Like I have said before, you can never till what sort of strange project I have going on. I lost my other trap in the river.


This is a photo of my grapes that I am growing. This is the second year for the vines and I have allowed a few of them to produce grapes. The variety is blanc dubois. They are suppose to be pierce disease resistant.


Saturday, May 2, 2009

Recent Photo's of Bees & Honey

This year I have started a garden from some very good soil. I have burned my wood flitches and scrap wood here for about 10 years. The soil is dark and grows very large weeds so I thought I would make a garden out of the spot. The bee hives are within 50 feet of the garden. Hopefully I will have some fresh veggies this year. I have planted corn, strawberries, peppers, squash, tomatoes, potato's, bush snap beans, and my grape vine cuttings were rooted in 1/2 of of one row. The bees should enjoy this.


This is another view of the garden that I have started this year. I put an 8 foot cyclone fence around it to be sure I have no deer in there. It is small (23' x 23') but I have 7 rows of veggies in an area that I can reasonably manage and water. (I ran a 3/4" water line to the garden underground and have it set up nicely for irrigation purposes.)


It is hard to see but the extractor had honey almost to the extractor cage.


It was about 3 1/2 gallons in there that we extracted from 2 hives.


I am now emptying the extractor with a screen filter.


Ahhhhhhh the sweet rewards of backyard bees.


This is a fun little video of the bees in action.


This is a photo of my 3 hives that I keep in my backyard. The middle hive is the new split hive.


Thursday, April 30, 2009

Update on the Swarm Catch

I have been checking on the swarm that I caught using the bee pheromone and the hive is growing nicely. I added three more frames of foundation to the nuc hive the other day and all looks ok. I am going to leave the nuc hive at its original location until the hive is stronger and I will then transfer to a full size Langstroth. I opened my other hives today and for some reason the bees are not moving above the queen excluder below the new supers that I placed this year. I have heard others have had this problem also so I removed the queen excluders. The bees appear to be increasing in numbers. My Dad called me today and he has caught another swarm for me. I think I will place this hive in my father-in-law's garden. The hive beetles are definitly under control with the traps. Excellent move installing the beetle traps.

Friday, April 24, 2009

Swarm Catch

The other day I placed a nuc hive on a tree with new swarm pheromone attached to the front. I did this to two nuc's. I just checked the boxes and I actually have a swarm in one of the boxes. That pheromone really works. Today I filled the swarm catch box with frames (I only originally placed 2 frames with wax because I was doubtful that I would actually catch a swarm.) At any rate I have a new hive to manage now and it was essentially free and required only a small effort to attach the nuc hive to the tree. Not bad for a few minutes work. The other 3 hives are growing quickly. I am anticipating harvesting honey from them in about 2 months. My Father also caught a swarm for me the other day, I just need to have the time to go get it, that will give me 5 hives. I have been giving honey away to all friends and work cohorts. It is a pleasure to share the honey with others.

Friday, March 27, 2009

Added Honey Supers

The hives are doing great, I now have 3 hives since the split. I think they have actually increased in size and vigor more rapidly than if I had not split the hive. I feel that the hives should be challenged to prevent swarming. I have very little hive beetles since I installed the hive beetle traps in my hives. I am now only seeing 2-3 hive beetles with each inspection. I placed a queen excluder below each honey super. Hopefully we will be extracting honey soon.

Saturday, March 21, 2009

Split a Hive

On March 17 2009 I formed a new hive from two hives. The procedure I used is as follows:
First I smoked the donor hives and opened them to the brood hive. I took 2 frames of brood, and 2 frames of honey from one hive and 3 frames of brood (opened and closed) from the other donor hive. I did not shake the nurse bees. I added some empty fundation to make a total of 10 deep frames to start the new hive. I was careful not to take the queens from the two donor hives. I also switched the new hives location and orientation to the same location of one of the donor hives. I turned one of the donor hives a different direction. This was done so that returning field bees would go to the new hive and not the donor hive. On March 21 2009 I introduced a purchased queen to the new hive. I could have allowed the new hive to start their own queen but I did not feel like waiting 3 or 4 weeks for her to start laying. At any rate I now have a new hive that is growing quickly. I feel that you must challenge your hives to prevent swarming. This allows healthy multiplication of your hives. Oh and by the way, the small hive beetle traps are excellent. I did not observe any SHB's during the above process.

Monday, February 16, 2009

Hive Beetle Trap

This gives you an idea of how the oil trap is accessed from the rear.
There were 7 small hive beetles in the oil after about 20 hours. Some pollen in there also.

This is how I access the hive trap from the rear of the beetle trap.


This is a photo of the beetle trap installed on my bee hives.


This shows a good overall view of the trap.


The cookie sheet slides out for easy access.


The door fits snugly into the opening and the latch is closed to secure the door.


Door is in and latch closed


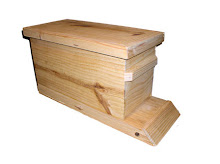
I recently built hive beetle traps for my hives. They are quite simple to construct. They are essentially the same outer dimensions of a Langstroth hive. I used 1 1/2 x 3 1/4 inch lumber to build the main frame, I then stapled #6 hardware cloth to the top. I have a shelf for the cookie sheet (10x15) and I have rear access to the cookie sheet that has used cooking oil in it. The results are amazing. I was told by an old bee keeper that this is all he uses for management of the hive beetles and that I would have a hard time maintaining my hives with hive beetles present. No chemicals needed. This is one of the most effective traps I have seen for small hive beetles. I took a video of my bees the other day and wanted to try this out on the blog, hope you enjoy this. Photo's of the hive beetle traps are soon to be posted.


Check out the little video of my bees.

Saturday, January 24, 2009

Hive Entrance Feeder


Today there was a very cold front that swept through our area and I became concerned for the Bees. I wanted to be sure that they had plenty of nutrition to maintain their temp. I needed a hive feeder that was quick and easy to make. I chose to build an entrance feeder because I did not want to open the hive in this cold weather. I saw no other plans for this on the net and so I devised my own. Not fancy but it did work. I hope the photos explain the process.

Shitake Mushrooms Anyone?


Another interest I have developed is that of growing mushrooms. I have read numerous articles on the net and have read (The Mushroom Cultivator) by Paul Stamets and JS Chilton. It is a very good book for the individual whom is interested in this sort of thing. I have recently (1/19/2009) inoculated the growing substrate (oak log). I purchased my fungi from fungiperfecti.com. The process is quite simple. Simply cut some fresh oak logs, seal the ends with wax, after 2 weeks you can inoculate the logs with your fungi and seal the holes with wax. I chose to grow shitake but I also want to inoculate some portabella as well. I have published this post to serve as a reminder to me as to the date of inoculation. Some photo's of the fresh cut growing medium, melting of wax, wax on ends of growing medium, and my moisture meter showing 99%. Best to keep logs around 40% moisture content.

Nice Buck!


This is a photo that was taken the other day by my wildlife camera. Not too bad. Beautiful animal.

Saturday, December 20, 2008

Winter Hive Loss

Today it was quite warm (70 degrees) and I opened all 3 of my hives. The two hives that I purchased early in the year (May) are doing well. Lots of honey in there. The hive that I started late (August) has essentially died. There was only a hand full of bees in there and no queen or any honey. I removed all frames and stored for next spring for a new hive. I plan on splitting my good hive with a new fresh queen. I now see why the old addage of ("A swarm in May is worth a load of hay; a swarm in July is not worth a fly"). At any rate it was a learning experience. So now I am down to two hives. I think I will feed them occasionally to ensure they make it through the winter. I am also interested in growing Shitake mushrooms and have purchased a book on the propogation of mushrooms. I also have purchased shitake fungi plugs to inoculate my white oak log. I will do this in a couple of weeks and hope to photo this for you.

Wednesday, December 10, 2008

Sharing a recent Photo


I thought I would share this photo that was taken by my automatic camera the other day. (No I am not interested in shooting this beautiful animal.)

Wednesday, December 3, 2008

Intrigued by the Queens

I am now reading about how to breed and rear queens. I have not done much with the hives lately since it is too cold to open them, but I did place "Mite Check" in each of them to help eliminate the hive beetles that I have seen. I dislike those little critters. I do need to remove the strips in mid December. Mostly deer hunting and duck hunting now. I purchased a "Wild View" deer cam the other day and have it placed at a location of several rubs and scrapes. Hopefully I will have a photo of the big buck soon for you. I am also reading about queen rearing and breeding, I am intriqued by this process. Hopefully I will rear my own queens for next year if all goes as planned. I will update the steps that I am taking for queen rearing once I begin the process.

Wednesday, August 13, 2008

Solar Wax Extractor


I wanted to extract the wax from a hive that we removed from an old house. I read about some solar extractors on the net and thought this was a good idea. I made mine a little differently but with the same outcome. My wax extractor is simply an old fire extinguisher cabinet that you have seen in commercial buildings. They have the rounded plexiglas cover-excellent for solar heat collection. All I did was clean the cabinet up and painted the interior of the cabinet with a black paint. I also wrapped the cabinet with duct insulation for heat gain. I placed a foil pan that I perforated with a tiny nail inside another pan that is not perforated. I placed the wax on top of cheese cloth that is streatched over the perforated pan. It worked fine. I measured the temp inside the cabinet on a sunny day and it measured 138 deg. F

A Home Made Honey Extractor


My father acquired an old antique honey extractor from my grandfather. It was a basket case and the drum was rusted out but it was made of heavy cast iron gears and parts so this was salvageable. I bead blasted the entire extractor (except for the rusted out drum) until it was clean to bare metal. I then cleaned the bushings and replaced the 5/8 inch drive shaft with new. I then primed and painted the mechanism and it is now like new. I purchased a food safe plastic commercial trash and with some back yard engineering was able to make it work well for the barrel. I also was able to salvage the cast iron scissor gate and mounted it on the trash can. It works perfectly. I think the plastic trash can is an excellent barrel for the honey collection. It is easy to clean and very clean. Check out the photo. If interested in how to build this I will be glad to give you the info you need. But first, you need an old worn out extractor to start from.

Re Queen

I purchased a marked clipped wing queen from a reputable bee supplier from Alabama. The weak hive was closely inspected and I found brood but only a very sloppy pattern and very few brood cells were noted. This hive is weak due to either a weak queen or an old queen. I purchased the queen and she arrived intact and healthy. I removed all the frames and located the old queen and eliminated her. I then removed a frame from the middle of the brood hive and placed the queen in this location with the candy plug up. Hopefully would be released in a few days. We shall see.

Update: 5 days later: the queen is still in there. I opened the candy plug so that I could actually see the queen in there through the plug. Will check on her in a couple of days.


Update: 8 days later: The queen is still in the queen cage! I could not believe that she had not been released with the candy plug partially opened...so I completely opened the candy plug. I know she will be released now, all she needs to do is walk out of the cage. Will check in a week for eggs.

Saturday, July 19, 2008

More photo's of the swarm capture


These photo's show somewhat of the hiving process. After removing the swarm from the limb as shown in the photo's below, We placed the limb with the swarm in a plastic trash can and covered the can with a towel and secured this for transport to the hiving location. I used a towel to cover the trash can so the bees could have good air circulation for transport. Once at the hiving location, I allowed the bees to calm for an hour or so. I had to build a new brood hive because I had none on such notice. I did have 5 frames of foundation for the brood hive although 10 are needed. Will order more at first of the week. At any rate, I placed the new brood hive in a location about 75 yards from my other bees for the hiving process. I opened the swarm container and took the limb out and placed it over the new brood hive and simply shook the bees off into the new brood hive. I then turned the trash can upside down over the brood hive and thumbed the sides where most of the bees fell into the brood hive. I then placed the frames with foundation and placed the inner and top cover on. I then allowed them to calm until about 1 hour before dark and then I moved the hive to the final location near the other bee hives. So far so good. I hope they stay.

July Swarm


I have read that "a swarm in July is not worth a fly." But my Dad called today and one of our good hives swarmed today and he was wanting to know if the swarm was worth capturing. Sure, why not. Upon arriving at the swarm it was noted to be quite large. I took photo's of what we did to retrieve the bees and also of what I did to hive them. I think they will be ok. I know this is a healthy queen because she grew the old hive quite rapidly. Enjoy the photo's.